Feed Audio and Video to an Iphone 7
How to Record Professional Audio on an iPhone or iPad with an External Microphone
[Disclaimer: Mediashi is a participant in the Amazon Services LLC Associates Program, an affiliate advertising program designed to provide a means for sites to earn advertising fees by linking to Amazon.com. As an Amazon Associate, we earn from qualifying purchases.]
Whether recording a podcast, narration for video or upping your game for live video streaming projects like news interviews over Skype, many media professionals will come to a point where they want to learn how to record professional audio on an iPhone or iPad with an external microphone. Both iPhone and Android smartphones are incredible, tiny computers that have already eclipsed speeds of laptop computers from just a few years back. As a multimedia tool, though, the iPhone comes with inherent limitations. Those include limited connectivity through a single Lightning port, minimal voltage necessary to power some microphones and a reliance on consumer apps not intended for professional audio production. These limitations must be overcome in order to use the iPhone in coordination with professional audio equipment. That's where most media creators run into challenges or begin to accept sub-par results.
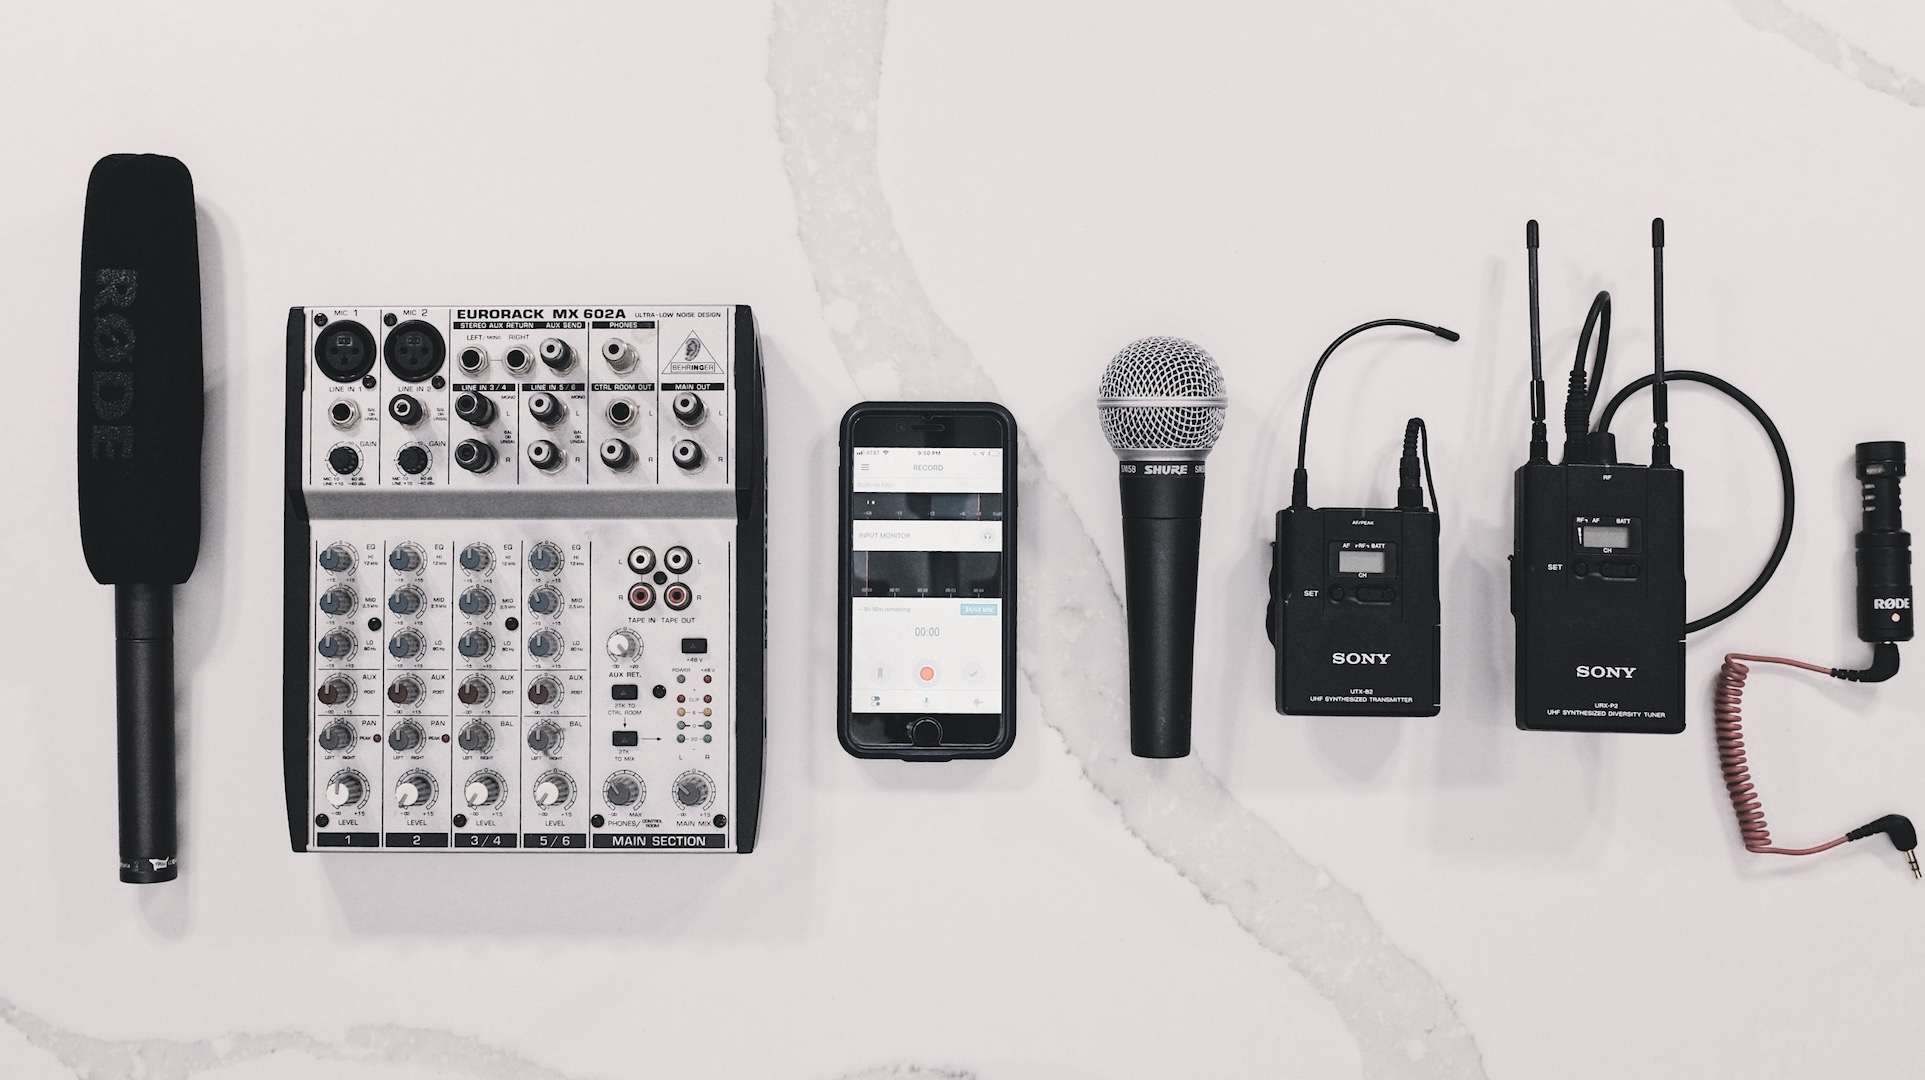
We'll examine several techniques to record professional audio on an iphone using external microphones. Specifically, we'll look at methods that require minimal additional equipment to connect your existing audio recording gear to the iPhone. These are the microphones we'll be using:
-
Shure SM-58 XLR Cardioid Microphone
-
Rode VideoMicro
-
Sony Wireless Lavalier Microphone
-
Rode NTG-2 XLR Condenser Shotgun Microphone
None of these microphones were made specifically to connect to an iPhone. We'll touch on some of those proprietary options below as well, but it's worth noting that audio gear has not changed as quickly as video over the years. That means investing in a good, industry standard microphone means you can continue to use it for years and with other equipment beyond the iPhone itself. It also means you won't be stuck with a useless microphone if Apple does away with its Lightning port on a future generation of phones.
FIRST, AUDIO RECORDING WITH THE IPHONE BY ITSELF
One should point out that by itself, the iPhone still proves to be a capable audio recording device. The built-in microphone on the iPhone is omnidirectional, meaning it is designed to pretty much pick up all the sound around the phone. That can be great if you're in a run and gun news setting where you don't have the luxury of precise microphone placement and a lot of standard newsroom microphones are omnidirectional already. The downside is that it means the iPhone picks up a lot of room noise and other background noise as well. However, under ideal conditions and using the right audio recording app, it can do wonders for simple audio-only projects. It's another story when you're trying to use that microphone for video projects with subjects more than two feet from the iPhone. In those situations, the sound recorded by the iPhone automatically makes your project seem amateurish.
Since at least the iPhone 4, some radio reporters have used the iPhone as their primary field recorder. It allows them to record decent quality audio consistent with a lot of news coverage and even edit clips or email complete reports with multitrack audio back to the newsroom. And they do all this while keeping a low profile that allows them to jump quickly into the fray after a city council meeting to get that key soundbite before anyone else is even set up.
A NOTE ON IPHONE AUDIO RECORDING APPS
Whether using the built-in iPhone microphone or connecting an external microphone to your iPhone, the microphone itself is only one part of the equation. You also need to pair it with a good audio recording app. While audio technology hasn't changed dramatically in recent decades, the functionality of audio recording apps for iPhone varies greatly. Here are a few things to consider when picking your app:
-
Recording Format: Make sure the app records in a standard format that can be easily shared and edited by other software. WAV is the standard, high quality format, but audio files tend to be larger. MP3 is a compressed file that delivers good audio quality, especially for spoken word, with small file sizes.
-
Audio Monitoring: Not all apps allow you to listen to what you're recording through headphones as you record. A lot of people skip this step, but it means you sometimes discover unwanted noise afterwards and have to re-record. When possible, make sure to monitor the live recording with headphones.
-
Export Formats: When audio file sizes start to get large, you need convenient options to get the audio off of your iPhone. This is where a lot of apps vary. Most offer email and SMS export options, but the best audio recording apps also offer options like Send to FTP Server, WiFi Downloads or uploads to cloud storage directly from your iPhone.
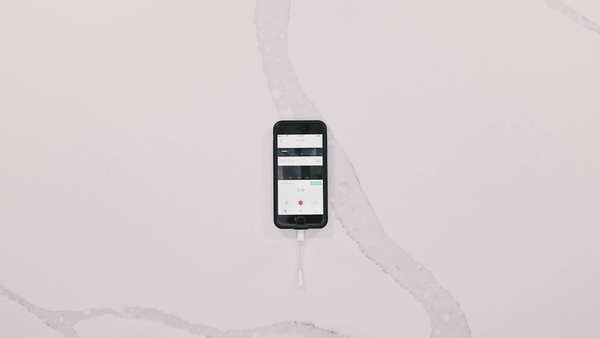
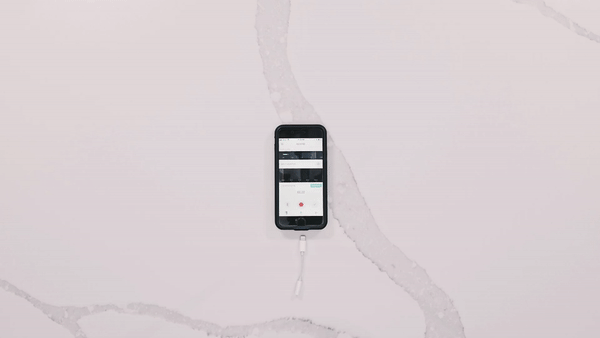
For the below examples on how to record professional audio on an iPhone with an external microphone, we'll be using the ShurePlus MOTIV audio recording app. It's designed to work with Shure's proprietary iPhone microphones, but works fine without them as well. The reason that we'll use it here is that in addition to checking the above boxes, it also automatically displays what microphone it is using as the audio source when recording. That will allow you to confirm that the iPhone correctly recognizes your external microphone instead of simply reverting back to the built-in microphone without you knowing.
IPHONE EXTERNAL MICROPHONE ADAPTERS: LIGHTNING VS. TRS TO TRRS ADAPTERS
One of the initial challenges to overcome is that smartphones, including the iPhone, rely on 3.5mm TRRS audio connections instead of the standard TRS connection. Standard TRS (tip-ring-sleeve) plugs communicate two channels of audio, primarily left channel and right channel. This is the standard for most headphones outputting stereo sound or consumer microphones inputting stereo sound. TRRS (tip-ring-ring-sleeve) adds a third channel to connect a mono microphone signal as well. If you plug a TRS headphone plug into a TRRS phone plug, you'll be able to hear fine and the phone will just use its own built in microphone. However, if you plug a TRS microphone plug into a TRRS smartphone plug, nothing happens. That's because it won't make the necessary connection for the microphone sleeve. So, we need an adapter.
Note that most cardioid microphones like the Shure SM-58 and Rode VideoMicro that we'll be using for tests do not require external power from a device or adapter. Condenser microphones, however, often require 48v of power, commonly referred to as phantom power, and only a handful of adapters provide that much power. Luckily, some condenser microphones can provide their own power with a battery.
For these demonstrations, we'll be using two TRRS adapters. The first is the Rode SC4 3.5mm TRS microphone to TRRS adapter (another option is the Movo MC3 3.5mm TRS microphone to TRRS adapter). The second is an XLR to TRRS adapter which does not transmit any power from the device to the microphone, so any microphone we connect will require its own power source. The XLR to TRRS does allow us to connect professional condenser microphones to the iPhone and the adapter also provides a dedicated headphone plug for monitoring audio, something frequently overlooked in the adapter market. If your iPhone lacks a dedicated headphone connection, you'll also need Apple's Lightning to headphone adapter.
CONNECT AN XLR CARDIOID MICROPHONE TO AN IPHONE
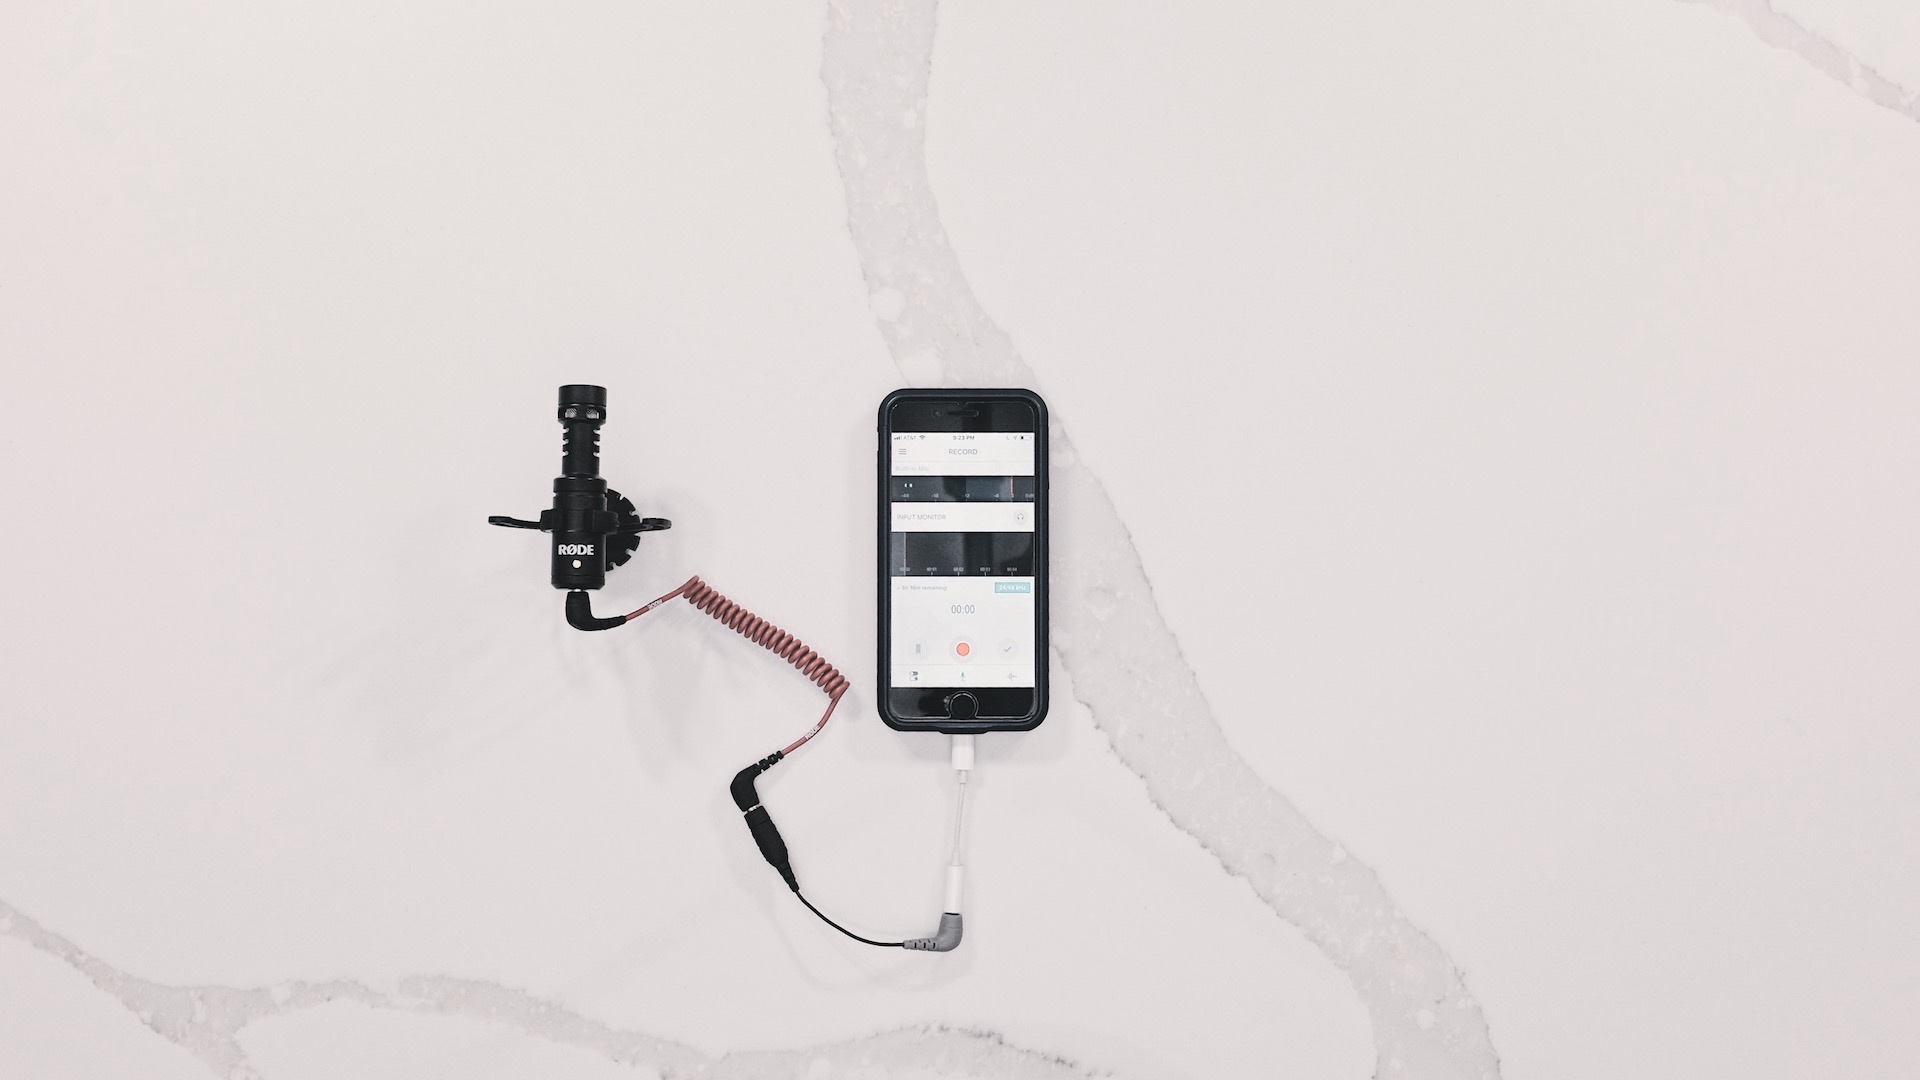
Cardioid microphones are perhaps the most common microphones you would want to connect to an iPhone and they are workhorses for many people working in audio. They do not require 48V of phantom power. For this example, we're going to connect a Shure SM-58 XLR cardioid microphone to an iPhone with a fairly simple set of adapters. We'll also connect the tiny RodeVideoMicro to an iPhone, although instead of an XLR connection, it uses a standard consumer TRS connection.
CONNECTING THE SHURE SM-58 MICROPHONE TO AN IPHONE
The Shure SM-58 is a durable microphone commonly used for stage performances and music recordings because of it's incredible audio quality and directional recording pattern. You need to be fairly close to and right in front of the microphone, but it's directional recording pattern means room noise and other distractions are often excluded from the recording. That's great if you don't have a dedicated studio space with sound treatment, but still want a high quality audio recording. The Shure SM-58 is also a great microphone for podcast recording in the home. Popular USB and condenser microphones marketed to beginning podcasters are great for semi-studio environments, but in most cases they pick up way too much room noise and audio reflections. The Shure SM-58 solves those problems. There's also a lower cost version called the Shure SM-48.
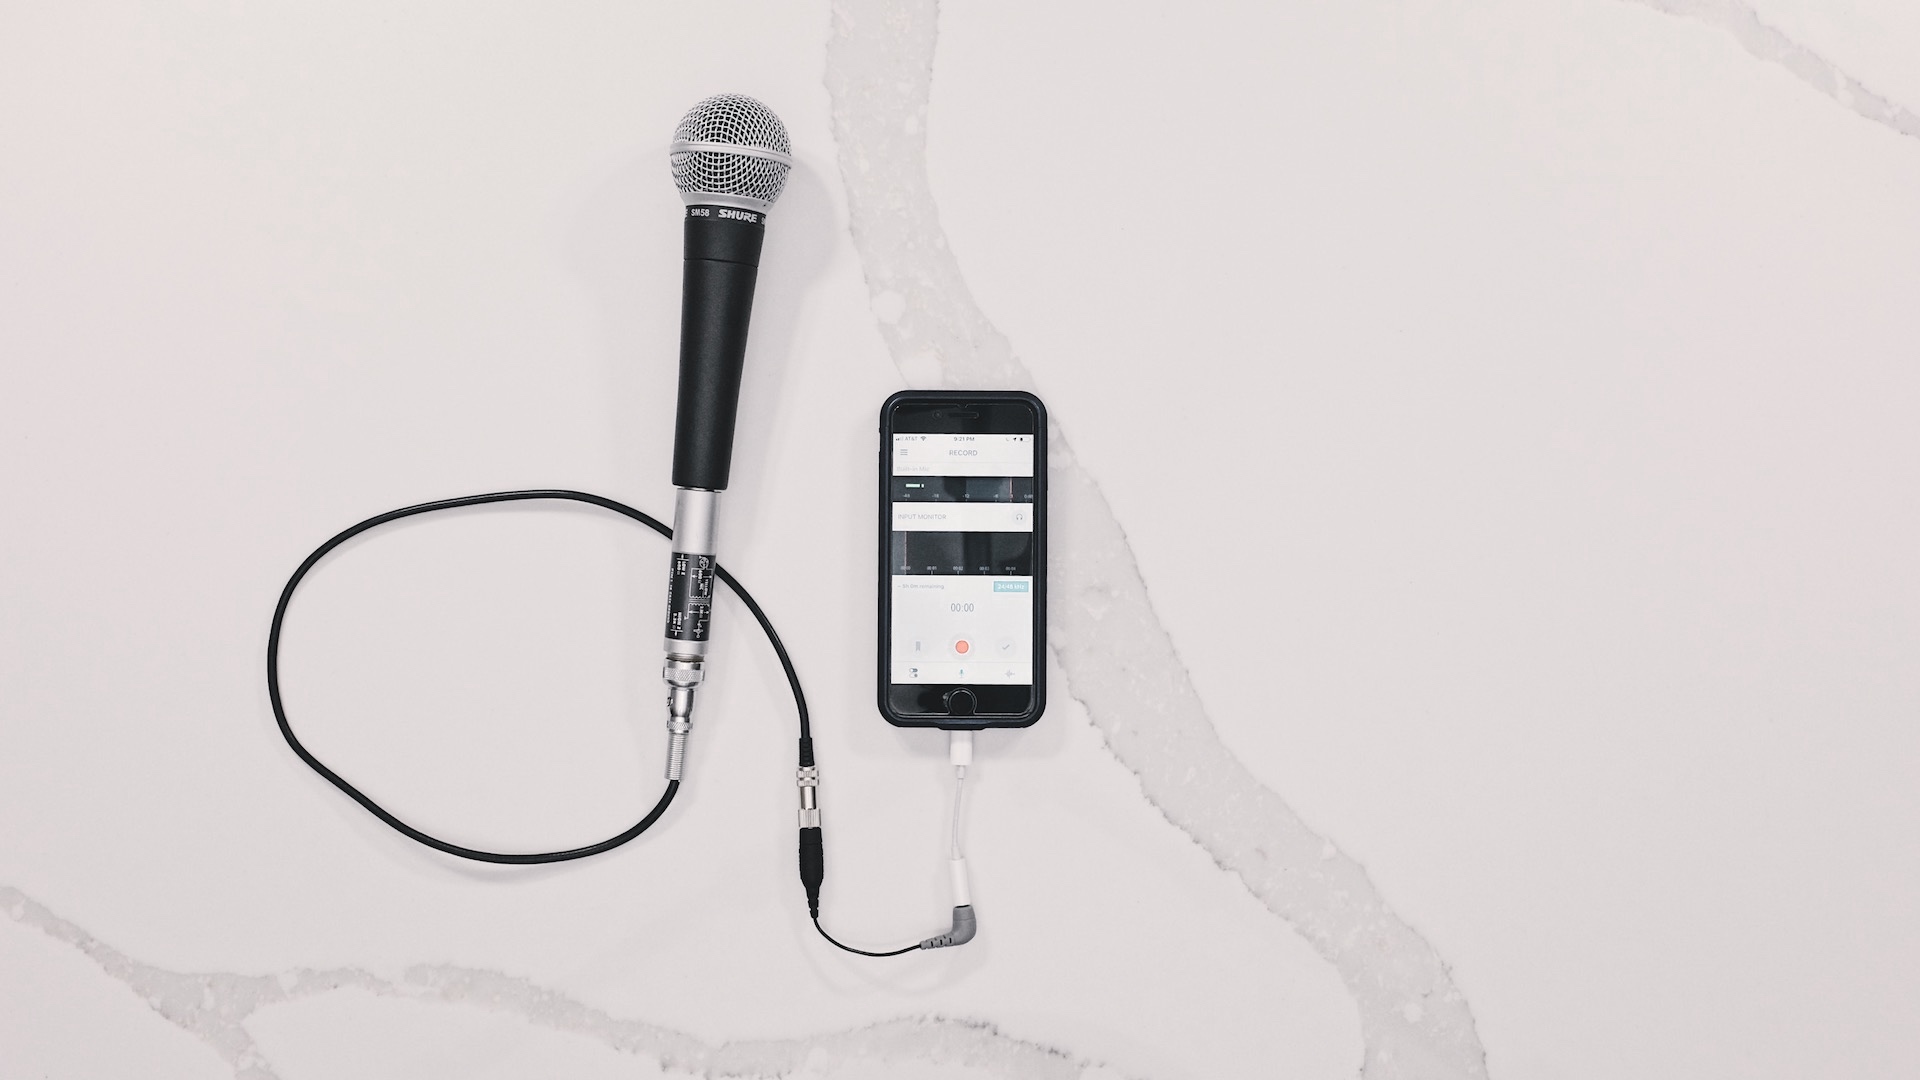
Connecting a Shure SM-58 cardioid microphone to an iPhone.
To connect the Shure SM-58 cardioid microphone to an iPhone, we'll use this series of adapters: Shure XLR to 3.5mm TRS adapter > Rode SC4 3.5mm TRS microphone to TRRS adapter > the standard Lightning headphone adapter that comes with the iPhone. If recording on an iPad, you can skip this last step and plug the Rode SC4 TRRS adapter directly into the headphone jack.
NOTE ON AUDIO EXAMPLES : All audio recording examples in this guide have had audio levels normalized using Audacity so volume levels will be equal across the recordings. No other changes have been made.
As you can hear in the audio sample, the audio quality is quite clean with minimal to no background hum or room noise. Like all the audio samples here, this was recorded in a normal home setting and not a studio. The audio recording level using this setup was low, though. If your iPhone audio recording app offers the option to raise the Gain for a stronger level, try to avoid it because that introduces more hiss and noise into the recording. It's more important to get a clean, high quality recording and then you can raise the level in post if needed like we did here. All together, this is a very simple, reliable setup to connect an external XLR cardioid microphone to an iPhone for much higher quality recordings. In addition to the low audio recording level, one other drawback is that the Rode SC4 TRS to TRRS adapter does not offer a headphone port to monitor audio, although some other adapters do.
CONNECTING THE RODE VIDEOMICRO MICROPHONE TO AN IPHONE
The Rode VideoMicro has become a popular, low cost microphone option for recording better audio for video on DSLR cameras and camcorders. It's also a nice option for the iPhone. The Rode comes with a hot shoe or tripod mount that reduces vibration and noise and even comes with its own furry microphone cover to reduce wind noise. Like the Shure SM-58, it's also very directional which means you need to ensure your audio source is directly in front of the microphone. Any audio to the sides or behind the microphone will be minimized.
Connecting the Rode VideoMicro to an iPhone is even easier because we do not require an XLR to 3.5mm TRS adapter. For this example, we'll plug the Rode VideoMicro directly into the Rode SC4 3.5mm TRS microphone to TRRS adapter and then plug that into the iPhone using the Lightning headphone adapter.
Like the Shure SM-58, the directional cardioid pattern here produces a pretty clean recording. The audio levels were still lower than desired, but without much background noise. That means that instead of raising the Gain in the recording app, we were easily able to Normalize the audio in Audacity afterward without introducing more noise. Also similar to the Shure SM-58, the Rode VideoMicro needs to be close to your subject for a quality recording. Most online examples show the microphone mounted onto or next to the iPhone or camera five or six feet away. At that distance, the Rode VideoMicro will not deliver good results. If you need to be that far away from your subject for video, consider mounting the microphone on a boom pole or similar mount 12 or so inches above the subject and just out of the video frame and using a normal stereo extension cable to connect the microphone into the Rode SC4 adapter. If you're just recording audio without video, that shouldn't be a problem.
Connecting a Rode VideoMicro cardioid microphone to an iPhone.
Note that Rode also makes two other versions of the Rode VideoMicro specifically for the iPhone called the Rode VideoMic Me with a native TRRS adapter to plug directly into the iPhone and the Rode VideoMic Me-L with a native Lightning connector. If you will only be recording and producing audio on your IOS device and don't want the flexibility to use other equipment, those could be options worth considering too.
CONNECT A WIRELESS LAVALIER MICROPHONE TO AN IPHONE
When recording video on an iPhone, it can be especially challenging to record good audio. The iPhone's omnidirectional microphone just records way too much room noise. In those situations, it may be best to use a wireless microphone for iPhone video recording, especially if your subject needs to move around. There are a lot of wireless lavalier microphone systems on the market, but note that audio quality and flexibility correlate closely to price. All of these systems consist of a transmitter connected to a lavalier microphone and a receiver that you connect to your recording device, in this case the iPhone.
In this example, we're going to connect a Sony wireless lavalier microphone to an iPhone. Our setup of adapters looks like this: Sony wireless receiver with XLR output > XLR to TRRS adapter > Lightning headphone adapter. Note that the XLR to TRRS adapter also provides a headphone out port to monitor our audio.
As you can hear, the lavalier microphone's more omnidirectional pattern picks up a little more room noise, but also provides much more improved audio quality over the iPhone's built in microphone. That's especially true when you consider that with the wireless lavalier system, the transmitter can be five or even 50 feet away from the receiver without any change in audio. Because the lavalier system uses a powered condenser microphone and provides its own power, the recording level on the iPhone was also much higher without needing to raise levels much in post production. Many wireless lavalier systems also provide the option of adjusting the output level from the receiver, allowing you to adjust your audio levels there instead of relying on the iPhone's gain adjustment, which just introduces more noise.
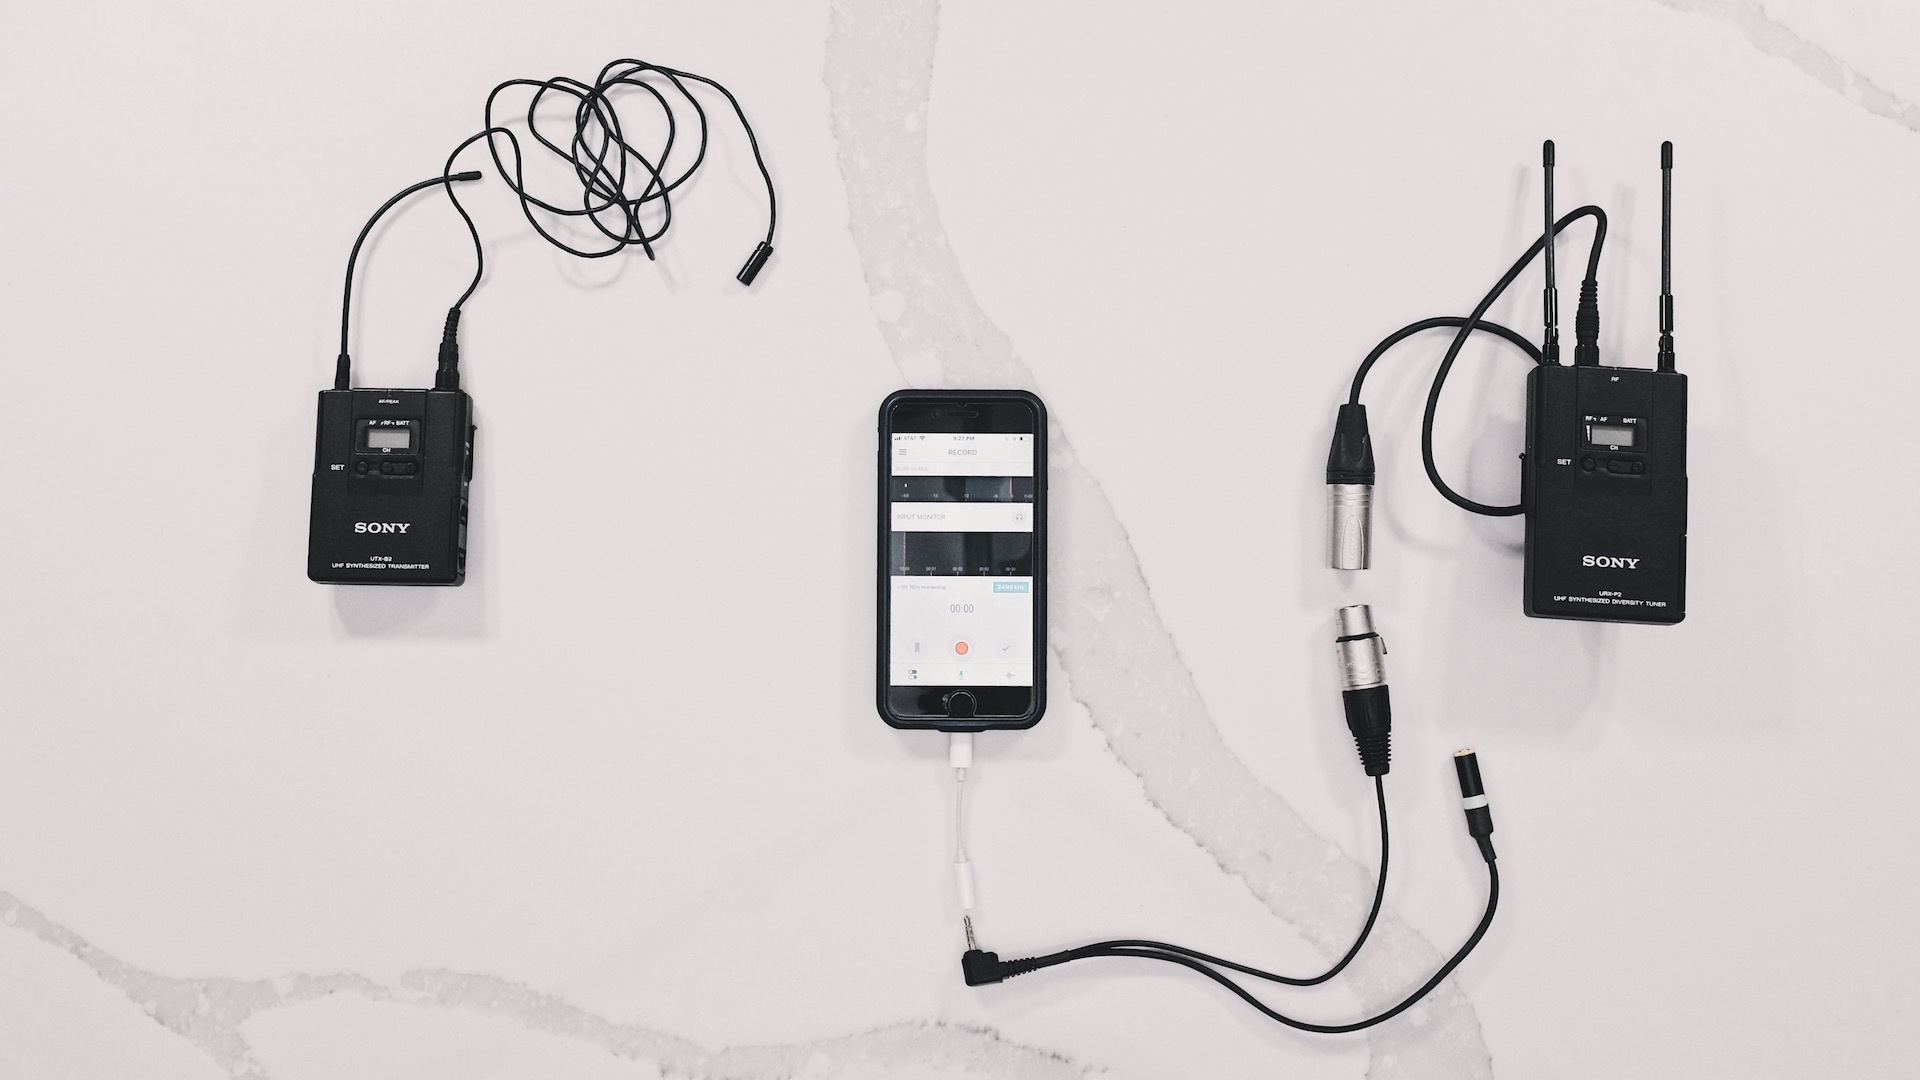
Connecting a wireless lavalier microphone to an iPhone.
Two additional quick notes on connecting a wireless lavalier microphone to an iPhone. First, it's always important to monitor your audio because depending on the frequency the system is using to transmit audio, you could encounter interference from other devices using that same bandwidth. More expensive systems generally offer a greater variety of signals so you can easily switch to another frequency without interference. Also, just because the wireless lavalier system is designed to use with a lavalier microphone, you can often connect other microphones as well.
IPHONE VIDEO RECORDING APPS THAT USE AN EXTERNAL MICROPHONE
If you are using a wireless lavalier microphone for your audio recording, there's a good chance you're working on a video project. The iPhone's native camera app will allow you to use an external microphone, but it won't tell you whether it is using the external microphone signal or reverting to your internal microphone. There are several other iPhone video recording apps that use an external microphone and also confirm for you that they're doing so.
For these audio tests, we're using the ShurePlus Motiv app, but Shure also has an iPhone video recording app called the ShurePlus Motiv Video. Like the audio app, it will confirm whether it is recording using the external microphone and also show the audio levels you're recording. For even higher quality video recording and more semi-professional video tools, another popular option is the FiLMiC Pro app which also offers more control of the audio elements of your video recording.
CONNECT AN XLR CONDENSER OR ANY PROFESSIONAL MICROPHONE TO AN IPHONE THROUGH AN AUDIO MIXER
The next setup will allow you to connect an XLR condenser microphone, or really any XLR professional microphone, to an iPhone using an audio mixer or soundboard. This setup certainly involves more setup and practice, as well as introduces more potential points of failure or sources of noise into you recording. It also offers the greatest flexibility and degree of control over your recording and audio quality.
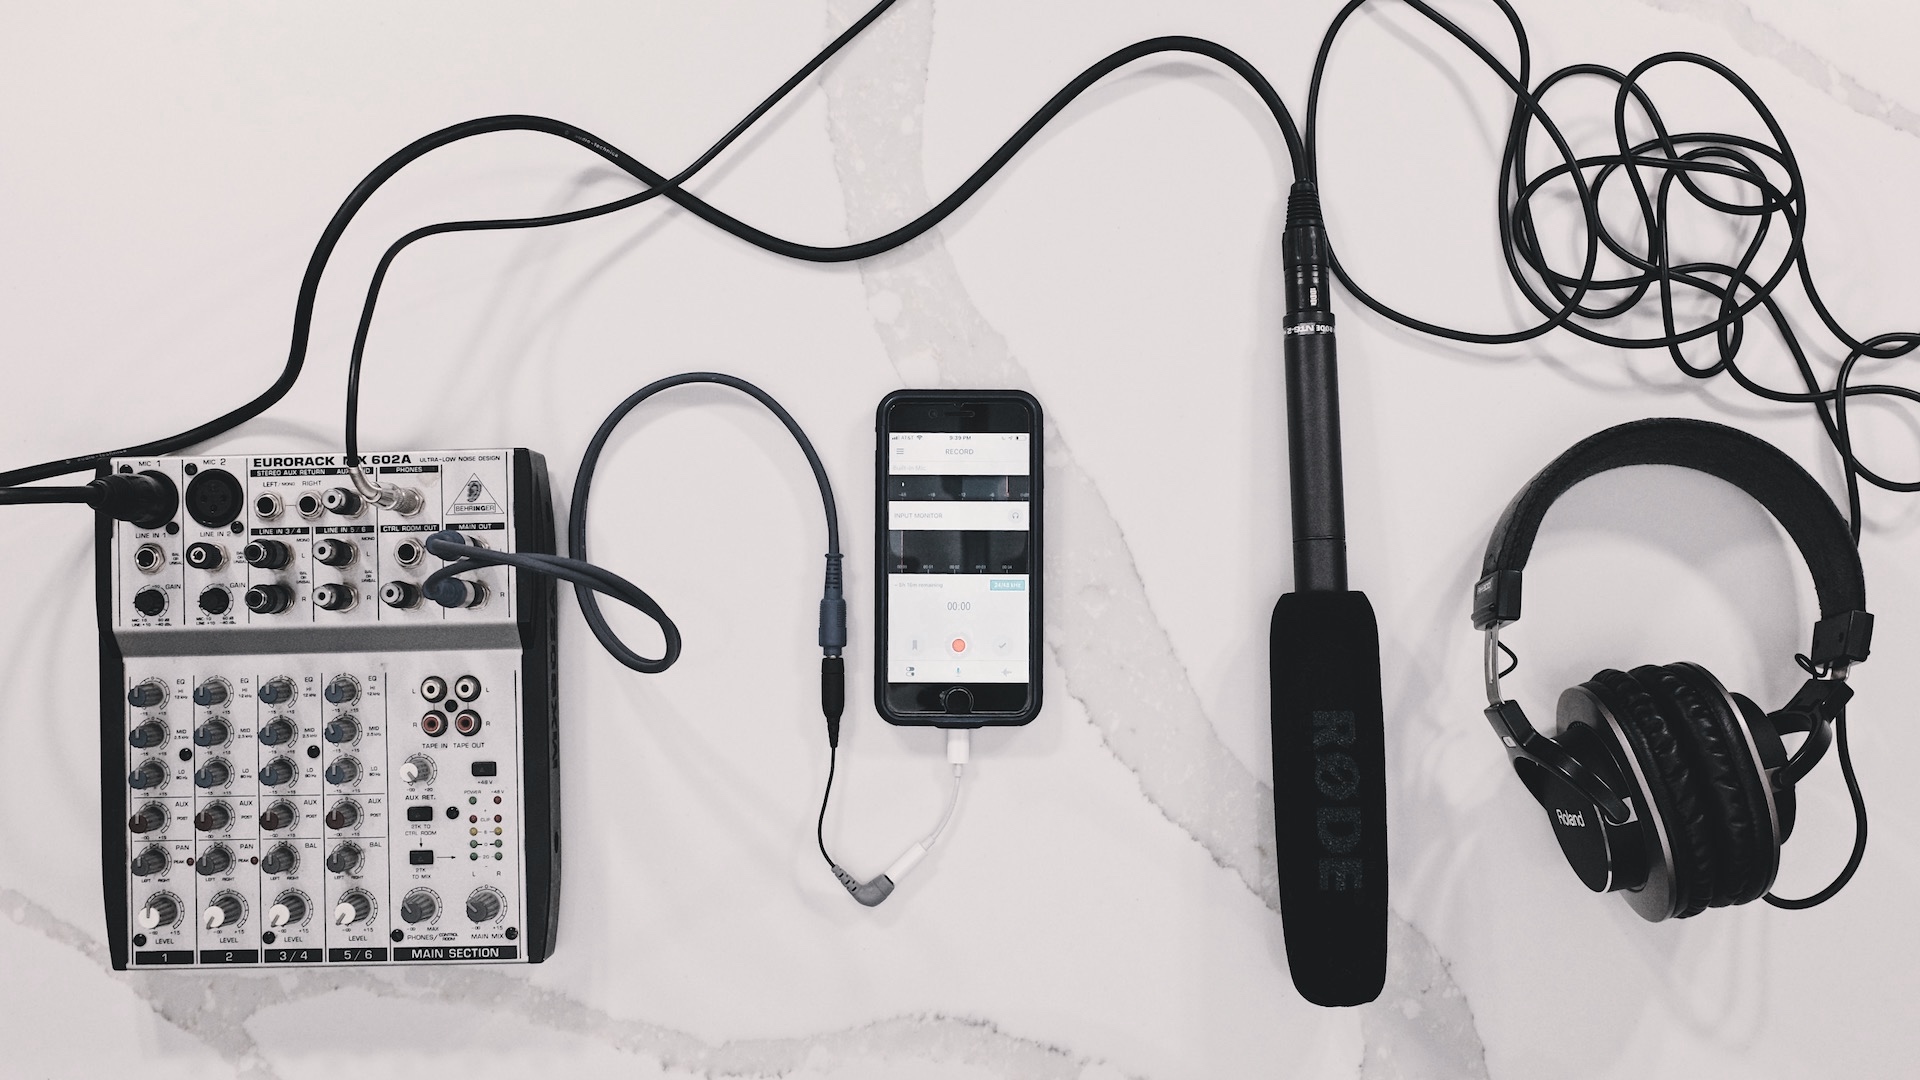
Connecting a Rode NTG-2 condenser shotgun microphone to an iPhone using an audio mixer.
Using a dedicated audio mixer or soundboard to record audio on your iPhone not only allows you to use any microphone or audio source you have, but it also allows you to use multiple sources. Each pot, or audio channel, has independent controls that allow you to adjust the audio level for that microphone in addition to fine tuning things like the low, mid and high audio frequency for each source. For example, hearing a low level refrigerator hum? You can minimize that with your low frequency adjustment. And an audio mixer or soundboard also has the option of providing the 48v of phantom power you need for a condenser microphone. In this example, we'll be using the Rode NTG-2 XLR Condenser Shotgun Microphone.
Our setup from microphone to iPhone looks like this: Rode NTG-2 shotgun microphone > XLR to XLR microphone cable > Behringer audio mixer with Phantom Power turned on > RCA to 3.5mm TRS adapter connected to the main audio output of the audio mixer > Rode SC4 TRS to TRRS adapter > Apple Lightning headphone adapter > iPhone. Make sure all of the connections are secure because a loose connection at any point will introduce noise into your recording.
Also beware that when using this setup, you have three different points where you control audio levels: the audio mixer input for the microphone, the master audio output of the audio mixer and the iPhone recording level. If the audio level or gain is turned too high for any individual control, you will introduce background hum and noise into your recording. That means you need to experiment, starting with each level turned to the 25% mark and then adjust things incrementally from there to ensure you achieve optimal recording quality. And while the Rode SC4 TRS to TRRS adapter does not include a headphone out jack to monitor your recorded audio, the audio mixer will. That allows you to do a lot of the work balancing audio levels on the board before you even need to worry about the iPhone. That also helps you connect any microphone through the audio mixer. Here's a test using the Shure SM-58 cardioid microphone with the audio mixer and we're able to get a much stronger signal, reducing the need to normalize or boost audio levels in post production.
Recording audio on the iPhone using an audio mixer or soundboard is the closest you'll get to a traditional pro recording setup. A simple audio mixer can be a flexible, rather cost effective tool as well, but they do require a little more experience, or at least willingness to experiment and learn to ensure you get the best possible audio quality. This audio recording setup certainly isn't difficult, though, and learning how to use it properly will translate to any future audio or multimedia recording project you work on, whether or not it involves an iPhone.
HOW TO RECORD MULTIPLE AUDIO SOURCES ON AN IPHONE
By introducing an audio mixer or soundboard into your production setup, you also introduce a lot of new opportunities, like recording multiple audio sources on your iPhone and mixing them to a single file. This is what audio mixers were designed for. Have three microphones and three people you want to record for your podcast? No problem. Just plug each microphone into a different pot on the audio mixer and set levels independently. Want to include someone else who can't be in the room? You can add them as well by calling them on the phone, Skype, Facetime or another audio chat app and plugging another iPhone into the audio mixer. Just make sure you're wearing headphones so you can hear them and set everyone's audio level correctly.
ALTERNATIVE METHODS TO RECORD PROFESSIONAL AUDIO ON AN IPHONE
We've discussed several easy ways to connect an external microphone to an iPhone to record professional audio, but there are a lot of other options out there as well. A wide range of adapters exist, from the simple to the more complex, and they all offer different opportunities and challenges.
MICROPHONES WITH BUILT IN LIGHTNING ADAPTERS FOR IPHONE
Several companies now make external microphones with built in Lightning adapters for connecting to an iPhone or iPad. Audio quality varies and you get what you pay for, but depending on your needs, some of these microphones can offer an easy solution for your use case. Rode makes a version of the Rode VideoMicro used here that uses Apple's Lightning connector called the Rode VideoMic Me-L. Samson's even come out with a wireless microphone system that connects over a Lightning port and Shure has a whole line of microphones and microphone adapters designed specifically to work with the iPhone. These microphones certainly make it easy to get started, but none of them offer professional audio quality. Another challenge is that relying on the Lightning port prevents you from using them with other equipment later on or possibly even with new Apple products if the company replaces the Lightning port down the road, which has happened before.
MICROPHONE ADAPTERS WITH LIGHTNING OR TRRS OUTPUT FOR IPHONE
Another solution is a dedicated microphone adapter that connects directly to a Lightning port or a TRRS plug. IK Multimedia makes several of these for iPhones and other smartphones like their iRig Pre which also provides the 48v of phantom power needed to power a studio condenser microphone. There's also the similar Saramonic SmartRig Di, which offers the same XLR to Lightning connection with the option to provide phantom power. Shure provides several higher end microphone adapters that connect over the iPhone's Lightning connection as well. There are several options on the market, but be sure to read reviews and listen to audio samples before buying one. They will not all work perfectly with all microphones, but they do offer a simple, off the shelf solution to basic recording.
HOW TO USE APPLE'S USB ADAPTER TO CONNECT A MICROPHONE TO AN IPHONE
A particularly appealing option is using Apple's Lightning to USB Camera Adapter to connect a microphone to an iPhone. Despite the name, it works with a lot more than cameras. If you're using a USB microphone with a computer, you will be able to connect it to your iPhone using this adapter. Note, however, that for several higher end condenser microphones like the Blue Yeti, you'll need to add a powered USB hub into the mix because the iPhone cannot pass along the 48v of phantom power you'll need.
The other great thing about this setup is that you can pair the Apple adapter with another simple USB audio adapter to connect any TRS microphone plug to the iPhone and still have a headphone out port for monitoring audio. That makes it a lot easier to connect a wide range of microphones to your iPhone, although you still don't get the ability to adjust levels. You could, though, still use the audio mixer setup described above and connect it to your iPhone using one of these adapters instead.
CONCLUSION: REMEMBER THAT SIMPLICITY IS KEY TO AUDIO PRODUCTION
Even after eight or nine generations of iPhones, the most reliable and high quality audio recorder remains a dedicated field recorder like the Tascam DR-100. To borrow Apple's old tagline, it just works. App based recording with software will always be inherently buggy and prone to failure. Apple's flimsy Lightning port will also never be as solid or reliable as a professional XLR audio connection. That said, there are many scenarios out there where trying to route professional microphone audio to an iPhone actually solves a lot of other challenges.
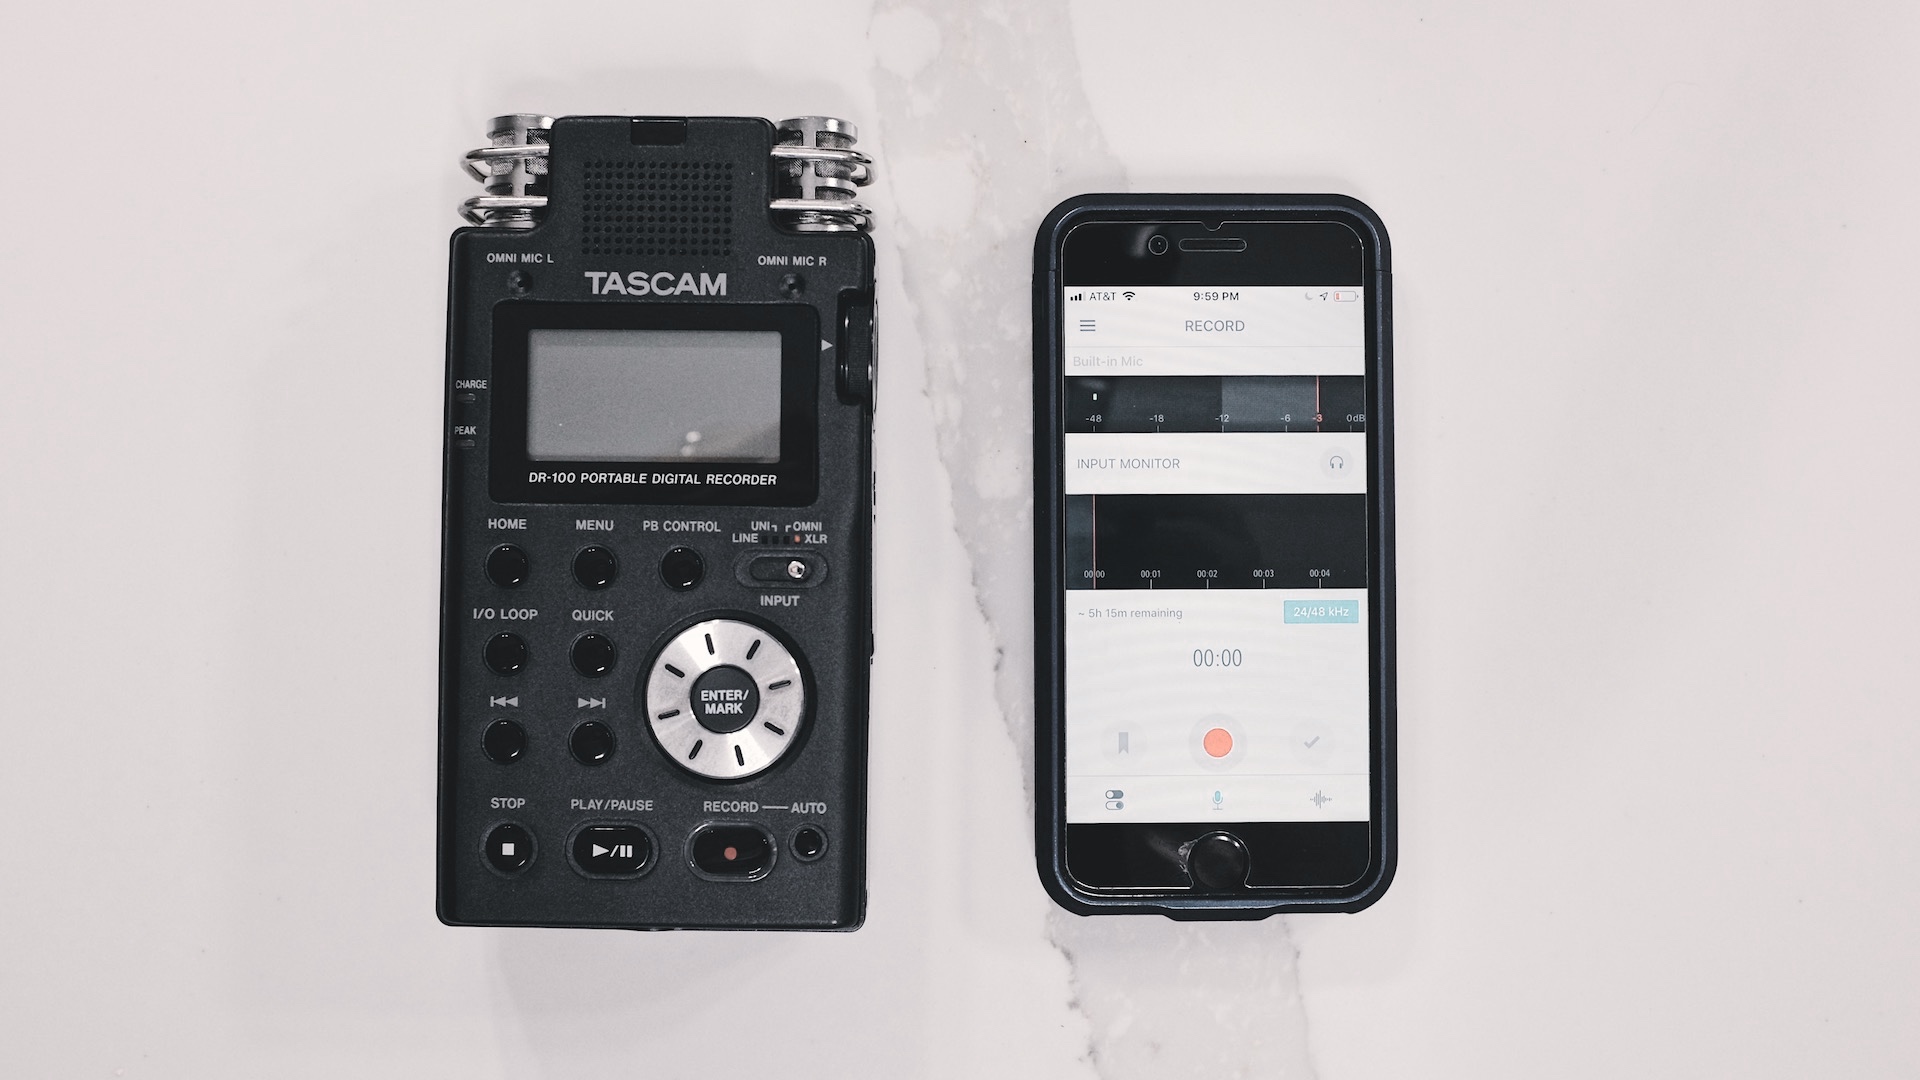
A dedicated audio field recorder compared to the iPhone.
For real professional recording, the key is to keep it simple. That means reducing potential points of failure in your setup and opportunities to introduce unwanted noise into your recording. That said, if you need an extra recorder, are operating with minimal equipment (and budget) or simply want to keep your multimedia production kit light and flexible (think lightweight travel studio), the iPhone offers a plethora of recording opportunities that could answer the prayers of even the most particular of multimedia journalists, YouTubers and podcast producers. You just need to understand what those opportunities are and how to get the most out of your iPhone as an audio and multimedia recording device.
Source: https://www.mediashi.com/articles/how-to-record-professional-audio-on-an-iphone-or-ipad-with-an-external-microphone
0 Response to "Feed Audio and Video to an Iphone 7"
Post a Comment